SSH Tunneling
for VNC, HTTP, and other applications and protocols
Author: William M. Hartung
Date: 04/13/2005
Why use SSH?
SSH provides a protected means to access remote hosts and networks. It is much more secure than FTP file transfer, since passwords in FTP are sent in plain text, and data is not encrypted. SSH provides various forms of encryption to provide protection at the highest levels of security by todays technological standards. It is also a great way to provide site protection by opening up only one port (SSH port 22), and allowing a client to access other services behind the router/firewall. Opening up all of the ports that would be accessed at the router/firewall level can pose a much higher threat for invasion.
Putty configuration
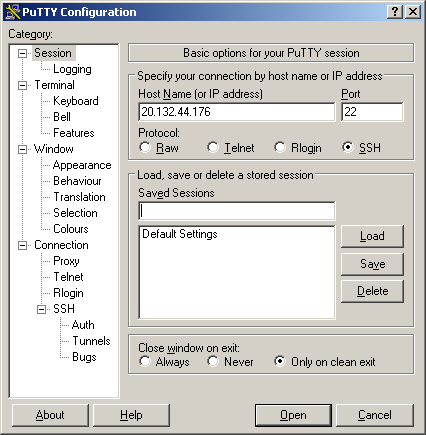
- The Putty application must be configured with a proper host name or IP address, and an SSH port number. The host name or IP address should be the real IP address of the host running the SSH server. If you are behind a router (NAT Firewall), this is the IP address of the router, not the host behind the router. If you use non-standard ports on your router, you must use the proper port that forwards traffic to the SSH server on the host behind the router. To configure these options, you must enter the information under the “Session” tab as shown in Figure 1.

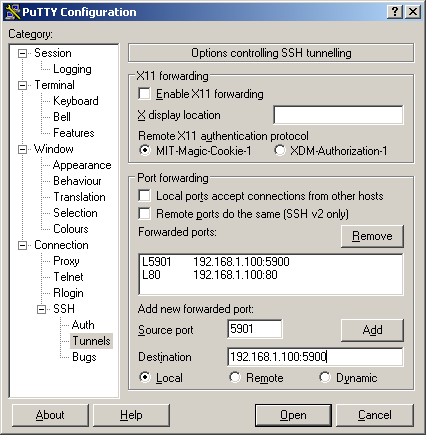
- Next, you must configure the “Tunnels” section of the Putty application. In the “Source Port” field, enter 5901. In the “Destination” field, enter the IP address of the host, a colon, and the port number you wish to forward. If your host is behind a router, you must enter the local IP address, such as 192.168.1.100. The port you want to forward is the VNC server port, which in this case is 5900. You can forward any port you wish, such as port 80 if you are running a web server on the host, as shown in Figure 3.

- Lastly, you should go back to the “Sessions” section, and name and save your configuration options, or else you will have to enter them again.
VNC configuration, and HTTP information
- Once an SSH (Putty) connection is established, the forwarded ports will work as though they are running on the local (client) machine. This means that if you forwarded port 80 for a web server on the host, the client could just enter localhost in the address of their web browser, and access the web server on the host. For a VNC connection, just enter localhost:1 as shown in Figure 4 (the “1” corresponds with the 5901 port entered in the Putty configuration – VNC port 5902 would be display “2,” 5903 would be display “3,” and so on).

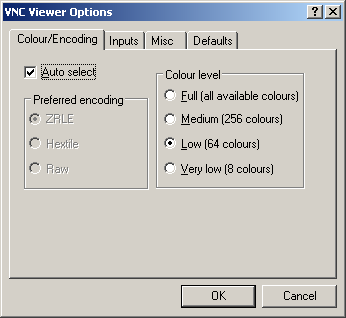
- Remember that using a VNC application through an SSH tunnel will be slower than using VNC independently. However, the SSH tunnel provides encryption so that you will not be subject to malicious activity by a hacker. You may be able to increase performance by sacrificing color, as shown in Figure 5. Many VNC Servers allow configuration of more performance options, such as cursor rendering, what and when to update, and higher performance encoding options.

SSH Command Line Options
Example:
ssh -1 -L 5901:localhost:5900 -p 4567 joe@10.5.1.3
Where…
- -1 is to force ssh version 1
- 5900 is the vnc port on the host
- localhost is the computer we want to access (this could be another ip within the host's network if we want to control another computer)
- 5901 is the tunneled port on the client (Display 1 in VNC client)
- 80 is the standard http port - it is tunneled here to provide access to the web server on the client
- 4567 is a nonstandard port on the host or the host's router to access ssh
- joe is the user name
- 10.5.1.3 is the external ip address to access the host over the Internet
- after all of this, the client should be able to control a remote vnc server by accessing localhost:1, or localhost:5901
Note - you can also add this, however it is a privileged port only available for root
-L 80:localhost:80
Troubleshooting
- If you have firewall (hardware or software), you may need to open up port 22 or the appropriate port for this to work.
