Mail Merge
Office 2004 (Mac)
Create the Documents
- note - keep these documents together in a folder
- create a document in Word, such as a letter that will be sent to each person in the spreadsheet
Add the Mail Merge Fields
- go to Tools → Data Merge Manager
- in the Data Merge Manager toolbar → Main Document, click Create → Form Letters
- in the Data Merge Manager toolbar → Data Source, click Get Data → Open Data Source…
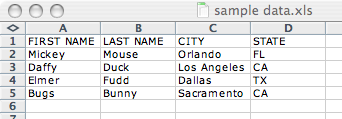
- select the Excel spreadsheet you created with the recipient data, and click Open
- when presented with the Open Workbook dialog, “Sheet1” and “Entire Workbook” should be filled in so just click OK
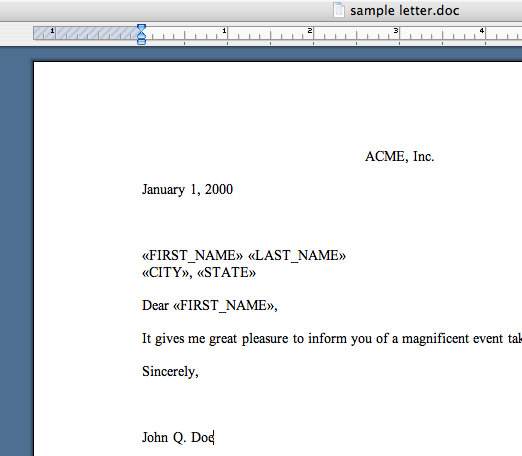
- in this Word document, find areas where you would like each person's name and other information to appear
- in the Data Merge Manager toolbar → Merge Field, drag and drop any desired fields into the locations you want that particular data to appear in your letter
Merging the Data into a Final Document
- in the Data Merge Manager toolbar → Merge, click the icon to “Merge to New Document” (this will allow you to preview your finished letters, whereas the “Merge to Printer” icon would just send all letters to the printer)
- you should now have a new document, with all fields automatically filled in by Word, and a page for each recipient
Labels
If you want to print labels rather than creating letters, you do everything the same way except instead of creating “Form Letters,” you create “Labels.” (Data Merge Manager toolbar → Main Document, click Create → Labels)
Advanced - Filtering Data
You have successfully merged data into letters, but what if you want to limit this letter to specific recipients? First you must decide how to “filter” your recipients. We will use the 1)“column with an x approach.” Let's say we only want to send this particular letter on Christmas, and there are only certain people who would need to receive the letter.
- make sure your letter has been saved and is closed
- first, add a column titled CHRISTMAS in your spreadsheet
- save your spreadsheet
- open your Word letter again, and click OK at the “Open Workbook Dialog”
- in your Word letter, do everything the same except the final step of Merging the Data into a Final Document:
- in the Data Merge Manager toolbar → Merge, click “Query Options”
- in the “Filter Records” tab, select the CHRISTMAS field, and for the Comparison, select “is not blank” (it won't care if we have “x”, “X”, “-” etc… in the CHRISTMAS field)
- notice that you can add up to six record filters in this tab (you could have an EASTER column, THANKSGIVING, etc…)
- note that all filtering rules are applied to this
- if you would like a particular order for your recipients, select the sorting field in the Sort Records tab (such as LAST_NAME, Ascending)
- click OK, and in the Data Merge Manager toolbar → Merge, click the icon to “Merge to New Document”
- you should now have a page for each letter sent to the filtered recipients
Advanced - Conditional Text
If you want the ability to have conditional text, such as comma with a space between city and state only when you have a city/state, or a line break from address1 only when you have text for address2, then you will need to add a conditional Word field.
- Comma:
- find a place where you want a comma, only when a certain field has data (such as between city and state - don't type a comma or space between them yet)
- your line may look like this: «CITY»«STATE»
- in the Data Merge Manager toolbar → Word Field, click and drag the “If…Then…Else” item to the location you want a conditional comma (between «CITY» and «STATE»)
- when the dialog appears, select the CITY field name, and for the Comparison select “is not blank”
- in the “Insert this text” box, type a comma and a space (, )
- leave the “Otherwise, insert this text” box blank
- now you should only see a comma and space when the record has a city
- Line Break (a little more complicated, not using the example above):
- find a place where you want a line break, only when a certain field has data (such as after address line 1, only when address line 2 has data)
- your lines may look like this:
<<FIRST_NAME>> <<LAST_NAME>>
<<ADDRESS1>><<ADDRESS2>>
<<CITY>> etc...
- in the Data Merge Manager toolbar → Word Field, click and drag the “If…Then…Else” item to the location you want a conditional line break (between the «ADDRESS1» and «ADDRESS2»)
- when the dialog appears, select the ADDRESS2 field name (not available from the example above), and for the Comparison select “is not blank”
- in the “Insert this text” box, type an X and click OK (leave the “Otherwise, insert this text” box blank)
- Why did we type an X? Because pressing return or enter will close this dialog without adding a line break. We will change the X into a line break in another place.
- you should see your X between the «ADDRESS1» and «ADDRESS2»
- right click your X, and select “Toggle Field Codes”
- you should see your X change to “{ IF ADDRESS1<>”“ “X” ”“ }”
- highlight this X and press return, (the return will make a line break replace the X) so your finished work should now look like this:
<<FIRST_NAME>> <<LAST_NAME>> <<ADDRESS1>>{ IF ADDRESS1<>"" " " "" }<<ADDRESS2>> <<CITY>> etc... - it might look intimidating, but now you should only see a line break after address line 1 when address line 2 has data
Advanced - Preview Section of Data Merge Manager
The Mac version of Word has a nice Preview section of the Data Merge Manager toolbar which allows you to see individual records prior to printing or merging into a finished document. To see the field values of the actual records, simply click the <html><<< >>></html> ABC icon, and click it again to turn it off and see the field names. To see the complex data for merge fields, click the { a } icon, and click it again to turn it off. Note that conditional rules may not be honored until your final document is created, so you will see commas and line breaks regardless of conditions while using the preview features.


